OAuth 2.0 & OpenID
Understanding OAuth 2.0: It’s More Than Just Login
Many developers and engineers tend to think of OAuth 2.0 solely as a social login feature. However, the core of OAuth lies not in Authentication, but in Authorization. From a security professional’s perspective, clearly distinguishing between these two is critically important.
- Login (Authentication): This is like an employee using their company ID to pass through an entry gate. It’s the process of verifying ‘who’ a person is and whether they are permitted to enter the company premises.
- OAuth (Authorization): This is like a visitor receiving a visitor’s pass at the front desk that grants them access only to a specific conference room. This pass does not allow them to roam everywhere in the building. In other words, it’s the process of granting permissions for ‘what a person can do’.
OAuth 2.0 is a standard protocol for securely delegating limited permissions to a third-party application (Client) to access resources (e.g., Google Drive files, Facebook friends list) on behalf of a user.
OpenID Connect (OIDC) vs. OAuth 2.0
A concept that is often confused here is OpenID Connect (OIDC).
- OAuth 2.0: Its primary purpose is Authorization. It determines answers to questions like, “Should I allow this app to post on my Facebook wall?” or “Should I allow this app to read my Google Calendar events?” The result is an Access Token.
- OIDC: This is an Authentication layer built on top of OAuth 2.0. Its purpose is to “verify who the user is.” The ‘Login with Google’ feature is a prime example of using OIDC, and the result is an ID Token containing the user’s identity information.
Simply put, OIDC tells you who the user is, and OAuth 2.0 grants an app permission to do things on that user’s behalf.
The Main Roles in OAuth 2.0
Before understanding the flow, let’s first get to know the actors in this play.
- Resource Owner: This is you, the user. As the owner of the data, you are the entity that grants access to your resources.
- Client: This is the third-party application that wants to access the user’s resources. (e.g., a “Google Calendar” app wanting to integrate with “Slack”).
- Authorization Server: This server authenticates the user and, with the user’s consent, issues Access Tokens to the Client. (e.g.,
accounts.google.com). - Resource Server: This is the server that stores the user’s actual information (resources). It validates the Access Token and serves the requested resources. (e.g.,
googleapis.com).
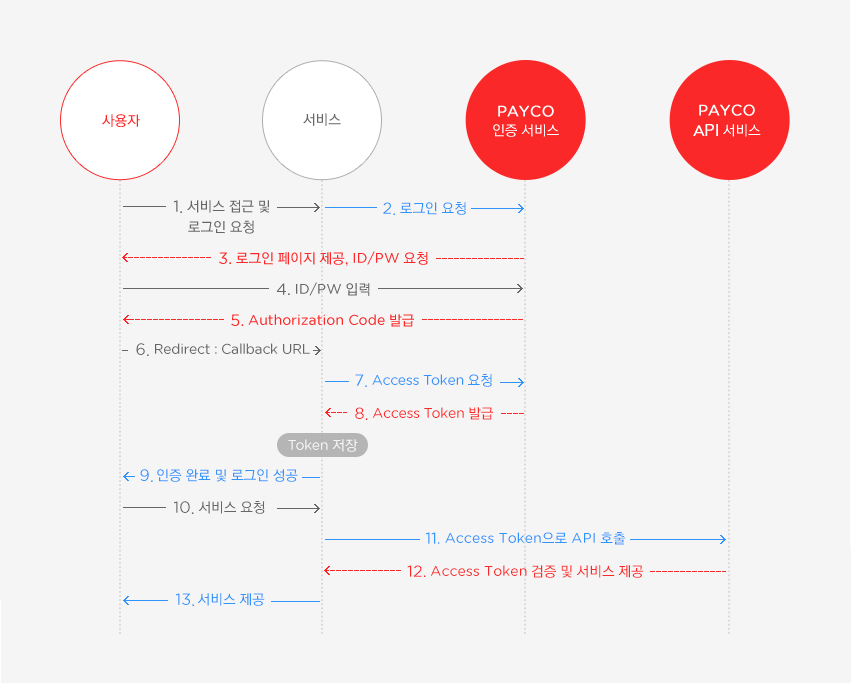
The Most Common Authentication Process: Authorization Code Grant Flow
Let’s take the most common and secure method for web applications, the ‘Authorization Code Grant Flow’, as an example.
- The User’s Request (Authorization Request) The user clicks a button like “Integrate with Google Account” in the client application. The client redirects the user to the Authorization Server (Google), sending along information like
client_id,redirect_uri,response_type=code, andscopeas query parameters.scope: The scope of permissions the client is requesting (e.g.,profile,calendar.read).
User Authentication and Consent The user is taken to the Authorization Server’s login page. After logging in, they see a consent screen like, “This app is requesting permission to access your profile information and read your calendar. Do you approve?” The user clicks ‘Allow’.
Issuance of the Authorization Code After confirming the user’s consent, the Authorization Server redirects the user back to the
redirect_uripreviously specified by the client. It includes a single-use Authorization Code in the URL. This code is typically valid for a short period (usually around 10 minutes).- Token Exchange Now, communication happens directly between the client’s back-end server and the Authorization Server, not through the user’s browser. The client server sends the authorization code it just received, along with its
client_idandclient_secret, to the Authorization Server’s token endpoint.client_secret: This acts like the client’s password and must never be exposed publicly. This is why this step occurs on the back-end instead of the front-end.
Token Issuance The Authorization Server validates the authorization code,
client_id, andclient_secret. If everything is valid, it finally issues an Access Token and a Refresh Token to the client.- API Call The client uses the issued Access Token to make requests to the Resource Server (Google API) by including it in the
Authorization: Bearer <Access Token>header. The Resource Server validates the Access Token and, if valid, returns the resources corresponding to thescopegranted in the token (e.g., profile information, calendar data).
Access Token
An Access Token is the key that proves permission to access the Resource Server.
- Purpose: It is a credential used to request protected resources (APIs) from the Resource Server.
- Characteristics:
- Short-lived: For security, it typically has a short lifespan, from a few minutes to a few hours. If the token is stolen, the window of time an attacker can use it is limited.
- Stateless: It often contains all the necessary information within the token itself (e.g., user identifier, permission scope, expiration time), as is the case with a JWT (JSON Web Token). The server only needs to validate the token, making it highly scalable as no state needs to be stored.
- Risk of Theft: As a Bearer token, anyone who possesses it can use it as if they were the owner. Therefore, it must be transmitted securely over HTTPS and stored in a location inaccessible to scripts in the browser (e.g., an
HttpOnlycookie).
How to Check for Token Tampering (JWT Signature Verification)
How can the Resource Server trust an Access Token sent by a Client? What happens if someone intercepts and changes the token’s content, like the scope or expiration time (exp)?
To solve this problem, many OAuth 2.0 implementations use JWT (JSON Web Token) as the format for Access Tokens. A JWT contains a digital signature within the token itself, allowing for immediate verification of its integrity.
A JWT is composed of three parts separated by dots (.): Header.Payload.Signature
- Header
- Specifies the token type (JWT) and the hashing algorithm used to create the signature (e.g.,
HS256,RS256). {"alg": "HS256", "typ": "JWT"}
- Specifies the token type (JWT) and the hashing algorithm used to create the signature (e.g.,
- Payload
- Contains the actual information of the token, known as claims. This includes the user’s identifier (
sub), permission scope (scope), expiration time (exp), issuer (iss), etc. - Important: The content of the payload is not encrypted, it is only Base64 encoded. Therefore, anyone can decode and view its contents. You must never include sensitive information like passwords in the payload.
- Contains the actual information of the token, known as claims. This includes the user’s identifier (
- Signature
- This is the core component that guarantees the token’s integrity.
- The signature is created by taking the Base64-encoded Header and Payload, joining them with a dot, and then hashing the result using the algorithm specified in the header (
alg) and a secret key. HMACSHA256(base64UrlEncode(header) + "." + base64UrlEncode(payload), secret)
The Signature Verification Process
When a Resource Server receives an Access Token (JWT), it verifies its integrity through the following process:
- Split the Token: The received JWT is split into its Header, Payload, and Signature parts at the dots.
- Recreate the Signature: The server takes the separated Header and Payload and recalculates the signature using the same algorithm specified in the header and the same secret key that only it and the Authorization Server know.
- For asymmetric key methods (e.g.,
RS256), the Authorization Server signs with its Private Key, and the Resource Server verifies with the corresponding Public Key. This method is more scalable and secure.
- For asymmetric key methods (e.g.,
- Compare Signatures: The newly generated signature is compared to the original signature that came with the token.
The result is simple:
- Match: If the signatures match, it means the token was issued by a trusted Authorization Server and has not been tampered with. The Resource Server can trust the content of the Payload and process the request.
- Mismatch: If the signatures do not match, it means that even a single bit in the Header or Payload has been altered. The token is considered tampered with or invalid and is immediately rejected (e.g., with a
401 Unauthorizedstatus).
Thanks to this signature verification mechanism, the Resource Server does not need to ask the Authorization Server, “Is this token valid?” every time. It can determine the token’s authenticity quickly and efficiently on its own.
Refresh Token
A Refresh Token is a special token used to obtain a new Access Token.
- Purpose: When an Access Token expires, the Refresh Token is used to automatically obtain a new one without requiring the user to log in (authenticate) again, thus improving the user experience.
- Characteristics:
- Long-lived: It has a much longer lifespan than an Access Token, lasting for days or even months.
- High Security Requirement: Because of its long life, it poses a significant security risk if stolen. It must be stored encrypted in the client’s secure database and must never be exposed in a browser or mobile app.
- Possible One-time Use: To enhance security, a practice known as ‘Refresh Token Rotation’ is recommended. When a refresh token is used to get a new access token, the old refresh token is invalidated and a new refresh token is issued alongside the new access token. This prevents the reuse of stolen refresh tokens.
From a penetration tester’s perspective, OAuth 2.0 vulnerabilities often arise from improper redirect_uri validation, Cross-Site Request Forgery (CSRF) attacks, and token theft or exposure. Therefore, a precise understanding of this flow and the roles of each token is the first step toward building and auditing a secure system.
🔐 OAuth 2.0, 제대로 이해하기: 단순한 로그인이 아니다
많은 개발자와 엔지니어들이 OAuth 2.0을 소셜 로그인 기능으로만 생각하는 경향이 있습니다. 하지만 OAuth의 핵심은 인증(Authentication)이 아닌 허가(Authorization)에 있습니다. 보안 전문가의 관점에서 이 둘을 명확히 구분하는 것은 매우 중요합니다.
- 로그인 (인증): 회사 직원이 사원증으로 출입 게이트를 통과하는 것입니다. 이 사람은 ‘누구’이며, 회사에 들어올 자격이 있는지 확인하는 과정이죠.
- OAuth (허가): 외부 방문객이 안내 데스크에서 방문증을 받아 특정 회의실에만 들어갈 수 있도록 허가받는 것과 같습니다. 이 방문증으로는 사내 모든 곳을 돌아다닐 수 없습니다. 즉, ‘무엇을 할 수 있는지’에 대한 권한을 부여하는 과정입니다.
OAuth 2.0은 이처럼 제3의 애플리케이션(Client)에게 리소스(예: 구글 드라이브 파일, 페이스북 친구 목록)에 접근할 수 있는 제한된 권한을 안전하게 위임(Delegate)하는 표준 프로토콜입니다.
OpenID Connect (OIDC) vs. OAuth 2.0
여기서 자주 혼동되는 개념이 OpenID Connect(OIDC)입니다.
- OAuth 2.0: 허가(Authorization)가 주 목적입니다. “이 앱이 내 페이스북 담벼락에 글을 쓰도록 허락할까?” 또는 “내 구글 캘린더 일정을 읽도록 허락할까?”를 결정합니다. 결과물은 Access Token입니다.
- OIDC: OAuth 2.0 위에 구축된 인증(Authentication) 계층입니다. “이 사용자가 누구인지 확인”하는 것이 목적입니다. ‘구글 계정으로 로그인’ 기능이 바로 OIDC를 사용하는 대표적인 예이며, 결과물로 사용자의 신원 정보가 담긴 ID Token을 받습니다.
간단히 말해, OIDC는 사용자가 누구인지 알려주고, OAuth 2.0은 그 사용자를 대신해 앱이 무엇을 할 수 있는지 허락해 줍니다.
🏛️ OAuth 2.0의 주요 참여자 (Roles)
흐름을 이해하기 전에, 먼저 연극의 등장인물을 알아봅시다.
- Resource Owner (사용자): 🧑💻 바로 당신입니다. 데이터의 주인으로, 자신의 리소스에 대한 접근 권한을 부여하는 주체입니다.
- Client (클라이언트): 사용자의 리소스에 접근하려는 제3자 애플리케이션입니다. (예: ‘슬랙’과 연동하려는 ‘구글 캘린더’ 앱)
- Authorization Server (권한 서버): 🛡️ 사용자를 인증하고, 사용자의 동의를 받아 Client에게 Access Token을 발급하는 서버입니다. (예:
accounts.google.com) - Resource Server (리소스 서버): 🗄️ 사용자의 실제 정보(리소스)를 저장하고 있는 서버입니다. Access Token을 검증하고 요청된 리소스를 제공합니다. (예:
googleapis.com)
🔑 가장 일반적인 인증 과정: Authorization Code Grant Flow
웹 애플리케이션에서 가장 흔하고 안전한 방식인 ‘인가 코드 승인 흐름’을 예로 들어보겠습니다.
사용자의 요청 (Authorization Request) 사용자가 클라이언트 앱에서 “Google 계정으로 연동하기” 같은 버튼을 클릭합니다. 클라이언트는 사용자를 권한 서버(Google)로 리디렉션시키며, 이때
client_id,redirect_uri,response_type=code,scope같은 정보를 쿼리 파라미터로 함께 보냅니다.scope: 클라이언트가 요청하는 권한의 범위입니다. (예:profile,calendar.read)
사용자 인증 및 동의 (User Consent) 사용자는 권한 서버(Google)의 로그인 페이지로 이동합니다. 로그인을 마치면, “이 앱이 당신의 프로필 정보와 캘린더 읽기 권한을 요청합니다. 허용하시겠습니까?”와 같은 동의 화면(Consent screen)을 보게 됩니다. 사용자가 ‘허용’을 클릭합니다.
인가 코드 발급 (Authorization Code) 권한 서버는 사용자의 동의를 확인한 후, 사용자를 클라이언트가 미리 지정한
redirect_uri로 다시 리디렉션시킵니다. 이때 URL에 일회성 인가 코드(Authorization Code)를 포함하여 보냅니다. 이 코드는 짧은 시간(보통 10분) 동안만 유효합니다.토큰 교환 (Token Exchange) 이제 사용자의 브라우저가 아닌, 클라이언트의 백엔드 서버가 직접 권한 서버와 통신합니다. 클라이언트 서버는 방금 받은 인가 코드와 자신의
client_id,client_secret을 권한 서버의 토큰 발급 엔드포인트로 보냅니다.client_secret: 클라이언트의 비밀번호와 같은 역할을 하며, 절대 외부에 노출되어서는 안 됩니다. 이 과정이 프론트엔드가 아닌 백엔드에서 이루어지는 이유입니다.
토큰 발급 (Token Issuance) 권한 서버는 인가 코드,
client_id,client_secret을 모두 검증한 후, 마침내 클라이언트에게 Access Token과 Refresh Token을 발급합니다.API 호출 (API Call) 클라이언트는 발급받은 Access Token을
Authorization: Bearer <Access Token>헤더에 담아 리소스 서버(Google API)에 API를 요청합니다. 리소스 서버는 Access Token의 유효성을 검증하고, 토큰에 부여된scope에 맞는 리소스(프로필 정보, 캘린더 데이터 등)를 클라이언트에게 전달합니다.
Access Token (액세스 토큰)
액세스 토큰(Access Token)은 리소스 서버에 대한 접근 권한을 증명하는 열쇠입니다.
- 목적: 리소스 서버에 보호된 리소스(API)를 요청할 때 사용되는 자격 증명입니다.
- 특징:
- 짧은 수명 (Short-lived): 보안을 위해 보통 몇 분에서 몇 시간 정도의 짧은 유효 기간을 가집니다. 만약 토큰이 탈취되더라도 공격자가 사용할 수 있는 시간이 제한됩니다.
- Stateless: 토큰 자체에 필요한 정보(사용자 식별자, 권한 범위, 만료 시간 등)를 담고 있는 경우가 많습니다 (예: JWT - JSON Web Token). 서버는 토큰만 검증하면 되므로 상태를 저장할 필요가 없어 확장성이 좋습니다.
- 탈취 위험: Bearer 토큰이므로, 이 토큰을 획득한 사람은 누구나 토큰의 주인 행세를 할 수 있습니다. 따라서 HTTPS를 통해 안전하게 전송하고, 브라우저에서는 스크립트가 접근하기 어려운 곳(예:
HttpOnly쿠키)에 저장하는 것이 권장됩니다.
✍️ 토큰 변조, 어떻게 확인할까? (JWT 서명 검증)
클라이언트가 리소스 서버로 전달하는 Access Token은 어떻게 신뢰할 수 있을까요? 중간에 누군가 토큰의 내용(예: 권한 범위 scope나 만료 시간 exp)을 바꾸면 어떻게 될까요?
이 문제를 해결하기 위해 많은 OAuth 2.0 구현에서는 JWT(JSON Web Token)를 Access Token으로 사용합니다. JWT는 토큰 자체에 ‘전자 서명’을 포함하므로, 변조 여부를 즉시 확인할 수 있습니다.
JWT는 .을 기준으로 세 부분으로 나뉩니다: Header.Payload.Signature
- Header (헤더)
- 토큰의 종류(JWT)와 서명 생성에 사용된 해싱 알고리즘(예:
HS256,RS256)이 명시됩니다. {"alg": "HS256", "typ": "JWT"}
- 토큰의 종류(JWT)와 서명 생성에 사용된 해싱 알고리즘(예:
- Payload (페이로드)
- 토큰에 담긴 실제 정보, 즉 클레임(Claim)이 들어갑니다. 사용자의 식별자(
sub), 권한 범위(scope), 만료 시간(exp), 발급자(iss) 등이 여기에 포함됩니다. - 중요: 페이로드의 내용은 암호화된 것이 아니라 Base64로 인코딩된 것뿐입니다. 따라서 누구나 디코딩해서 내용을 볼 수 있으므로, 비밀번호와 같은 민감 정보를 담아서는 절대 안 됩니다.
- 토큰에 담긴 실제 정보, 즉 클레임(Claim)이 들어갑니다. 사용자의 식별자(
- Signature (서명)
- 이 부분이 바로 토큰의 무결성(Integrity)을 보장하는 핵심입니다.
- 서명은
Header와Payload를 Base64 인코딩한 값을.으로 연결하고, 이를 Header에 명시된 알고리즘(alg)과 비밀 키(Secret Key)를 사용해 해싱하여 생성합니다. HMACSHA256(base64UrlEncode(header) + "." + base64UrlEncode(payload), secret)
서명 검증 과정
리소스 서버는 클라이언트로부터 Access Token(JWT)을 받으면 다음과 같은 과정으로 변조 여부를 확인합니다.
- 토큰 분리: 받은 JWT를
.기준으로 Header, Payload, Signature로 분리합니다. - 서명 재생성: 분리한 Header와 Payload, 그리고 리소스 서버만 알고 있는 동일한 비밀 키(Secret Key)를 사용해 Header에 명시된 알고리즘으로 서명을 다시 계산합니다.
- 비대칭 키 방식(예:
RS256)의 경우, 권한 서버의 Private Key로 서명하고 리소스 서버는 대응되는 Public Key로 서명을 검증합니다. 이 방식이 더 확장성 있고 안전합니다.
- 비대칭 키 방식(예:
- 서명 비교: 토큰에 담겨온 기존 Signature와 리소스 서버가 방금 새로 생성한 서명을 비교합니다.
결과는 간단합니다.
- 일치: 서명이 일치하면, 토큰은 신뢰할 수 있는 권한 서버로부터 발급되었으며 중간에 전혀 변조되지 않았음을 의미합니다. 리소스 서버는 안심하고 Payload의 내용을 신뢰하여 요청을 처리합니다.
- 불일치: 서명이 일치하지 않으면, Header나 Payload 중 어느 한 부분이라도 1비트라도 변경되었음을 의미합니다. 이 토큰은 변조되었거나 유효하지 않은 것으로 간주되어 즉시 거부(
401 Unauthorized)됩니다.
이러한 서명 검증 메커니즘 덕분에, 리소스 서버는 매번 권한 서버에 “이 토큰이 유효한가?”라고 물어볼 필요 없이 자체적으로 토큰의 진위 여부를 빠르고 효율적으로 확인할 수 있습니다.
Refresh Token (리프레시 토큰)
리프레시 토큰(Refresh Token)은 새로운 액세스 토큰을 발급받기 위해 사용하는 특별한 토큰입니다.
- 목적: 액세스 토큰이 만료되었을 때, 사용자가 다시 로그인(인증)하는 불편함 없이 새로운 액세스 토큰을 자동으로 발급받기 위해 사용됩니다.
- 특징:
- 긴 수명 (Long-lived): 액세스 토큰보다 훨씬 긴 유효 기간(며칠, 몇 달)을 가집니다.
- 높은 보안 요구: 긴 수명을 가진 만큼 탈취될 경우 심각한 보안 위협이 될 수 있습니다. 따라서 클라이언트의 안전한 데이터베이스에 암호화하여 저장해야 하며, 절대 브라우저나 모바일 앱 내부에 노출해서는 안 됩니다.
- 일회성 사용 가능 (One-time use): 보안 강화를 위해 리프레시 토큰을 사용하여 새 액세스 토큰을 발급받으면, 기존 리프레시 토큰은 무효화되고 새로운 리프레시 토큰을 함께 발급하는 ‘리프레시 토큰 순환(Refresh Token Rotation)’ 방식이 권장됩니다. 이를 통해 탈취된 리프레시 토큰의 재사용을 방지할 수 있습니다.
펜테스터 관점에서 OAuth 2.0의 취약점은 주로 redirect_uri 검증 미흡, CSRF(Cross-Site Request Forgery) 공격, 토큰 탈취 및 노출 등에서 발생합니다. 따라서 이 흐름과 각 토큰의 역할을 정확히 이해하는 것이 안전한 시스템을 구축하고 점검하는 첫걸음이 될 것입니다.