정보 확인
-
실행 후 브라우저 혹은 curl로 elastic search에 담긴 정보를 확인 할 수 있습니다.
Elastic Search Relational DB CRUD GET SELECT READ PUT UPDATE UPDATE POST INSERT CREATE DELETE DELETE DELETE - curl로 위의 정보를 기본적으로 사용 할 수 있으며 my_index3(예시)의 mapping정보를 받고 싶을 때에는 아래와 같은 명령어로 확인 할 수 있습니다.
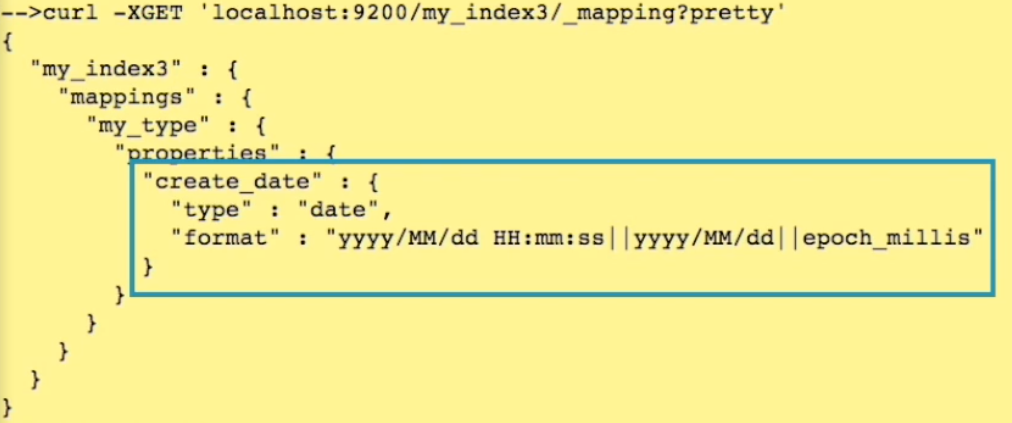
- localhost:9200/_mapping : 모든 index에 관한 mapping에 대한 정보를 보여줍니다.
- localhost:9200/books/_search?pretty : books index에 있는 모든 정보를 예쁘게 보여줍니다.
- 뒤에 ?pretty를 넣으면 JSON이 보기 좋게 출력됩니다.
다양한 예제로 사용해보기 위해 generator 사이트를 이용
주의사항
- POST를 할 때 index와 type에 대문자가 들어가면 안 된다.
Kibana dev tool 사용법으로 보는 Elastic Search의 사용법
1. Index Setting: library라는 새로운 인덱스의 setting값 설정.
PUT library
{
  "settings": {
    "number_of_shards": 1,
    "number_of_replicas": 0
  }
}
2. _bulk: 대량의 자료를 한꺼번에 넣을 때 사용.
POST library/books/_bulk
{"index":{"_id":1}}
{"title":"The quick brow fox","price":5, "colors":["red","green","blue"]}
{"index":{"_id":2}}
{"title":"The quick brow fox jumps over the lazy dog","price":15, "colors":["blue","yellow"]}
{"index":{"_id":3}}
{"title":"The quick brow fox jumps over the quick dog","price":8, "colors":["red","blue"]}
{"index":{"_id":4}}
{"title":"brow fox brown dog","price":2, "colors":["red","green","blue"]}
{"index":{"_id":5}}
{"title":"Lazy dog","price":9, "colors":["red","blue","green"]}
3. _search: 검색할때 아무 옵션을 주지 않으면 기본적으로 match all 검색이라는 것을 하는데 이 때 score 검색은 계산하지 않는다.
GET library/_search
{
  "query": {
    "match_all": {}
  }
}
4. title field중심으로 서치를 했을 때 4개의 다큐먼트가 매칭(hit) 되었는것을 알 수 있고 각 매칭된 다큐에 관한 score를 보여준다. 검색에 relevance 알고리즘을 이용되는데 이때 검색 단어가 많이 포함될수록 높은 점수를 얻는다.
GET library/_search
{
  "query": {
    "match": {
      "title": "fox"
    }
  }
}
"hits" : {
"total" : {
"value" : 4,
"relation" : "eq"
},
"max_score" : 0.32575768,
"hits" : [
{
"_index" : "library",
"_type" : "books",
"_id" : "1",
"_score" : 0.32575768,
"_source" : {
"title" : "The quick brow fox",
"price" : 5,
"colors" : [
"red",
"green",
"blue"
]
}
},5. match조건에서 띄어쓰기를 하면 기본적으로 or 검색이 된다.
GET library/_search
{
  "query": {
    "match": {
      "title": "quick dog"
    }
  }
}
{
"_index" : "library",
"_type" : "books",
"_id" : "3",
"_score" : 0.8634703,
"_source" : {
"title" : "The quick brow fox jumps over the quick dog",
"price" : 8,
"colors" : [
"red",
"blue"
]
}
},6. match_phrase: quick dog를 or 검색이 아닌 keyword처럼 한 단어로 인지해서 검색 할 때 사용.
GET library/_search
{
  "query": {
    "match_phrase": {
      "title": "quick dog"
    }
  }
}
"hits" : {
"total" : {
"value" : 1,
"relation" : "eq"
},
"max_score" : 0.6622029,
"hits" : [
{
"_index" : "library",
"_type" : "books",
"_id" : "3",
"_score" : 0.6622029,
"_source" : {
"title" : "The quick brow fox jumps over the quick dog",
"price" : 8,
"colors" : [
"red",
"blue"
]
}
}
]
}7. bool query: must, must_not, should를 사용 할 수 있다. must 조건안에서는 and조건으로 이어진다.
GET /library/_search
{
  "query": {
    "bool": {
      "must": [
        {
          "match": {
            "title": "quick"
          }
        },
        {
          "match_phrase": {
            "title": {
              "query": "lazy dog"
            }
          }
        }
      ]
    }
  }
}
"hits" : {
"total" : {
"value" : 1,
"relation" : "eq"
},
"max_score" : 1.3634887,
"hits" : [
{
"_index" : "library",
"_type" : "books",
"_id" : "2",
"_score" : 1.3634887,
"_source" : {
"title" : "The quick brow fox jumps over the lazy dog",
"price" : 15,
"colors" : [
"blue",
"yellow"
]
}
}
]
}8. should: 일종의 or 검색 개념으로써 정확한 조건이 없어도 검색이 되지만 매칭 되었을 시에 더 높은 스코어를 부여하게 하는 방식이다. boost: 3으로 했을 경우 매칭 되었을 때 기본 점수(1)의 3배 점수를 부여.
GET /library/_search
{
  "query": {
    "bool": {
      "should": [
        {
          "match_phrase": {
            "title": "quick dog"
          }
        },
        {
          "match_phrase": {
            "title": {
              "query": "lazy dog",
              "boost": 3
            }
          }
        }
      ]
    }
  }
}
9. must + should: 일단 must를 따져서 그 조건에 맞는 것을 선별하게 되고 should에 의해 점수가 올라간다.
GET /library/_search
{
  "query": {
    "bool": {
      "should": [
        {
          "match_phrase": {
            "title": "lazy"
          }
        },
      ],
      "must": [
        {
          "match": {
            "title": "dog"
          }
        }
      ]
    }
  }
}
10. highlight: field에 지정된 부분을 highlight 처리해서 결과 반환.
GET /library/_search
{
  "query": {
    "bool": {
      "should": [
        {
          "match_phrase": {
            "title": {
              "query": "quick dog",
              "boost": 2
            }
          }
        },
        {
          "match_phrase": {
            "title": {
              "query": "lazy dog"
            }
          }
        }
      ]
    }
  },
  "highlight": {
    "fields": {
      "title": { }
    }
  }
}
"hits" : [
{
"_index" : "library",
"_type" : "books",
"_id" : "5",
"_score" : 1.5781957,
"_source" : {
"title" : "Lazy dog",
"price" : 9,
"colors" : [
"red",
"blue",
"green"
]
},
"highlight" : {
"title" : [
"<em>Lazy</em> <em>dog</em>"
]
}
},
{
"_index" : "library",
"_type" : "books",
"_id" : "3",
"_score" : 1.3244058,
"_source" : {
"title" : "The quick brow fox jumps over the quick dog",
"price" : 8,
"colors" : [
"red",
"blue"
]
},
"highlight" : {
"title" : [
"The quick brow fox jumps over the <em>quick</em> <em>dog</em>"
]
}
},11. filter: socre에 영향을 미치지 않고 sub-set의 결과를 캐싱하기 때문에 쿼리보다 속도가 빠른편이다. bool조건과 함게 쓸 수 있다.
GET /library/_search
{
  "query": {
    "bool": {
      "must": [
        {
          "match": {
            "title": "dog"
          }
        }
      ],
      "filter": {
        "range": {
          "price": {
            "gte": 5,
            "lte": 10
          }
        }
      }
    }
  }
}
12. 아래의 방식에서는 숫자 기준으로 필터가 되는데 숫자에는 sscore 개념이 들어갈 수 없어서 score가 나오지 않는다.
GET /library/_search
{
  "query": {
    "bool": {
      "filter": {
        "range": {
          "price": {
            "gt": 5
          }
        }
      }
    }
  }
}
13. analyze: 주어진 text에 관해서 분석을 해주는 명령어. “lowercase”로 filter를 걸면 대소문자 구분 없이 분석을해준다. “unique”로 filter를 걸면 text안에 여러개의 동일한 문구가 있을 때 첫번째 것만 분석하고 동일한 나머지는 생략해서 결과를 보여준다.
GET /library/_analyze
{
  "tokenizer": "standard",
  "text": "Brown fox brown dog"
}
14. analyze는 일종의 모니터인데 elastic search가 어떤 식으로 문장을 분석하는지 보여준다. tokenize를 letter로 두면 quick.brown_fox가 한 단어로 검색되는 것이 아닌 quick, brown, fox처럼 나눠져서 알파벳으로만 검색되고 숫자, 특수문자는 생략된다.
GET /library/_analyze
{
  "tokenizer": "standard",
  "filter":[
        "lowercase"
  ],
  "text": "The quick.brown_FOx jumped! $19.95 @ 3.0"
}
15. tokenizer를 uax_url_email로 두면 메일과 url형식의 분리가 가능해진다. standard로 두면 @나 //문자들이 날라가게 된다.
GET /library/_analyze
{
  "tokenizer": "uax_url_email",
  "text": "elastic@example.com website: https://www.elastic.co"
}
16. aggregation: 해당 keyword에 대해 몇개의 document에서 발견 되었는지가 나온다.
GET /library/_search
{
  "size": 0,
  "aggs": {
    "popular-colors": {
      "terms": {
        "field": "colors.keyword"
      }
    }
  }
}
17. query랑 같은 레벨에서 쓰고 동시에 사용 할 수 있다. 동시에 사용 할 경우 query에서 match된 document안에서 aggs를 실행하게 된다. size가 0일시에는 query에 관한 검색결과는 나오지 않는다.
GET /library/_search
{
  "query": {
    "match": {
      "title": "dog"
    }
  },
  "size": 0,
  "aggs": {
    "popular-colors": {
      "terms": {
        "field": "colors.keyword"
      }
    }
  }
}
18. price-statistics와 poplular-colors는 내가 정한 변수명이다.
- price-statistics의 경우 : price를 기준으로 count, min, max, avg, sum을 알려준다.
- poplular-colors의 경우 : terms는 keyword에 해당하는 bucket들을 만들어주고 aggs를 통해 그 안에서 field(price)에 관해 원하는 값(avg)을 value로 표현한다.
GET /library/_search
{
  "size": 0,
  "aggs": {
    "price-statistics": {
      "stats": {
        "field": "price"
      }
    },
    "popular-colors": {
      "terms": {
        "field": "colors.keyword"
      },
      "aggs": {
        "avg-price-per-color": {
          "avg": {
            "field": "price"
          }
        }
      }
    }
  }
}
19. famous-librarians index의 setting값과 mappings값을 같은 레벨로 준다.
- setting: analyzer의 이름을 my-desc-analyzer로 쓰고 속성들을 정의할 수 있다.
PUT famous-librarians
{
  "settings": {
    "number_of_shards": 2,
    "number_of_replicas": 0,
    "analysis": {
      "analyzer": {
        "my-desc-analyzer": {
          "type": "custom",
          "tokenizer": "uax_url_email",
          "filter": [
            "lowercase"
          ]
        }
      }
    }
  },
  "mappings": {
    "librarian": {
      "properties": {
        "name": {
          "type": "text"
        },
        "favourite-colors": {
          "type": "keyword"
        },
        "birth-date": {
          "type": "date",
          "format": "year_month_day"
        },
        "hometown": {
          "type": "geo_point"
        },
        "description": {
          "type": "text",
          "analyzer": "my-desc-analyzer"
        }
      }
    }
  }
}
- mapping: famous-librarians index밑의 librarian이라는 type에 관한 field mapping을 하는 것이다. 처음 만들어 놓은 mapping에 대해서는 바꿀 수 없고 새로운 필드의 데이터가 들어오면 업데이트가 새로 된다. 하지만 만들어 놓은 맵핑을 바꾸기 위해서는 인덱스를 지우고 처음부터 데이터를 다시 넣어야 한다.
20. query_string: query_string fiedls를 기준으로 query에 해당하는 문자열을 검색한다. 이 때, 대소문자를 구분한다.
GET famous-librarians/_search
{
  "query": {
    "query_string": {
      "fields": [
        "favourite-colors"
      ],
      "query": "yellow OR off-white"
    }
  }
}
21. range 날짜 범위 검색: 특별히 now라는 keyword를 쓸 수 있는데 지금을 의미하고 now-200y는 지금으로부터 200년 전을 의미한다. y대신 m,d도 쓸 수 있다.
GET famous-librarians/_search
{
  "query": {
    "bool": {
      "must": [
        {
          "match_all": {}
        }
      ]
    },
    "filter": {
      "range": {
        "birth-date": {
          "gte": "now-200y",
          "lte": "2000-01-01"
        }
      }
    }
  }
}
22. geo_distance: hometown의 위치에서 100km안에 존재하는 documents를 검색한다.
GET famous-librarians/_search
{
  "query": {
    "bool": {
      "filter": {
        "geo_distance": {
          "distance": "100km",
          "hometown": {
            "lat": 32.41,
            "lon": -86.92
          }
        }
      }
    }
  }
}
curl 명령어로 elastic search를 control해야 할 때
위에서는 kibana에 있는 dev tool을 가지고 사용법을 설명해왔다. curl 명령어로 사용하려면 위의 방식과 조금 달라진다. 여기서는 curl에 관한 명령어를 설명하기보다 kibana에 있는 dev tools 기능을 가지고 쉽게 curl 명령어에 대해 공부할 수 있는 방법을 소개한다.
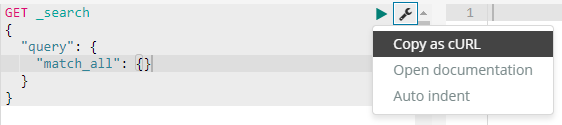 dev tools로 들어간 다음 도구에서 Copy as cURL을 클릭 하고 붙여넣기를 하면
curl -XGET “http://localhost:9200/test/doc/2”과 같은식으로 curl 명령어가 나오게 된다.
dev tools로 들어간 다음 도구에서 Copy as cURL을 클릭 하고 붙여넣기를 하면
curl -XGET “http://localhost:9200/test/doc/2”과 같은식으로 curl 명령어가 나오게 된다.
수정중
매칭이 잘 될 수록 점수가 높고 점수를 중심으로 rank가 정해진다.
숫자 범위, 날짜 중심, 거리 중심으로 검색 가능하다.